I have been wanting to learn to use pyplot, but haven’t found the time.
Last week I was inspired by Seth Brown’s post from
last year on command line analytics,
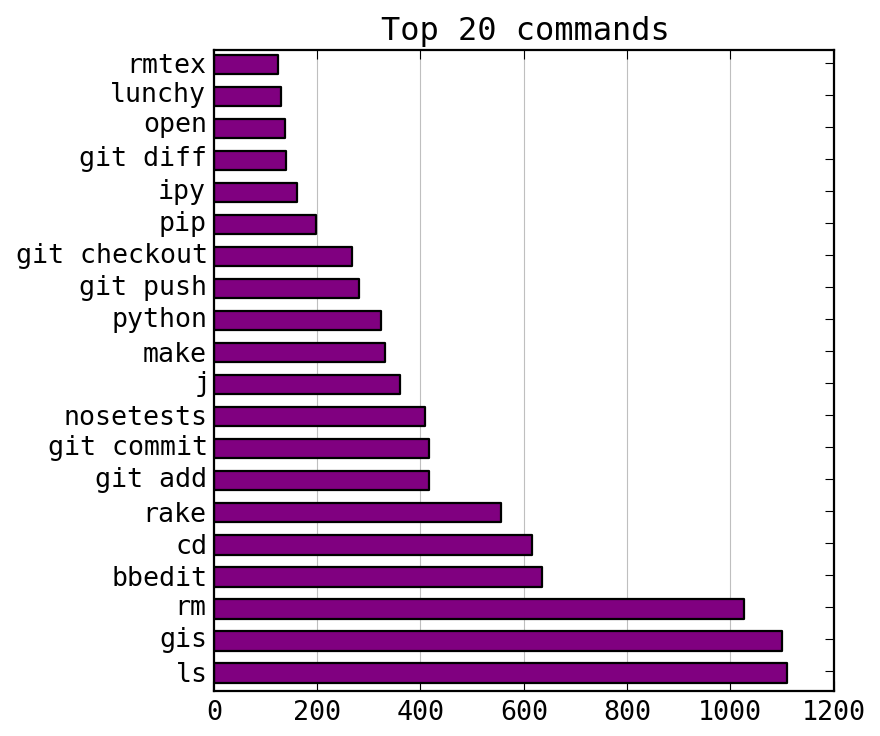
and I decided to make a graph of my most common commands.
I began using zshell on my home Mac about six months ago, and I have
15,000 lines of history since then:
I compiled a list of my top commands and made a bar chart using
pyplot. Since git is never used by itself, I separated out the git subcommands. Here are the results:
Clearly, it is time to use bb as an alias for bbedit.
I already have gic and gia set up as aliases for git commit and
git add, but I need to use them more often.
Building the graph
The first step is parsing the history file.
I won’t go into details, but I used Python and the Counter class,
which takes a list and returns a dictionary-like object whose values are
the frequency of each list item.
After creating a list of commands, you count them like this:
importmatplotlib.pyplotaspltimportmatplotlibimportnumpyasnpwidth=0.6N=20ys=np.arange(N)# change the fontmatplotlib.rcParams['font.family']='monospace'# create a figure of a specific sizefig=plt.figure(figsize=(5,5))# create axes with gridaxes=fig.add_subplot(111,axisbelow=True)axes.xaxis.grid(True,linestyle='-',color='0.75')# set ymin, ymax explicitlyaxes.set_ylim((-width/2,N))# set ticks and titleaxes.set_yticks(ys+width/2)axes.set_yticklabels([x[0]forxintop_commands])axes.set_title("Top 20 commands")# put barsaxes.barh(ys,[x[1]forxintop_commands],width,color="purple")# Without the bbox_inches, the longer labels got cut off# 2x version. The fractional dpi is to make the pixel width evenfig.savefig('commands.png',bbox_inches='tight',dpi=160.1)
I still find pyplot pretty confusing. There are several ways to accomplish
everything.
Sometimes you use module functions and sometimes you create
objects. Lots of functions return data that you just throw away.
But it works!
In the time between when I read up on S3 redirects and when I
published a post on what I had learned,
Amazon created a second way to redirect
parts of S3 websites.
The first way redirects a single URL at a time. These are the redirects
I already
knew about, which were introduced last October. They are created by attaching a special piece of metadata to an S3 object.
The second way was introduced in December, and redirects based on prefix. This is probably most useful for redirecting entire folders. You can either rewrite a folder name, preserving the rest of the URL, or redirect the entire folder to a single URL. This kind of redirect is created by uploading an XML document containing all of the redirect rules. You can create and upload the XML, without actually seeing any XML, by descending through boto’s hierarchy until you find boto.s3.bucket.Bucket.configure_website.
This week I put together a Python script to manage Amazon S3’s web page redirects. It’s a simple script that uses boto to compare a list of redirects to files in an S3 bucket, then upload any that are new or modified. When you remove a redirect from the list, it is deleted from the S3 bucket.
The script is posted on GitHub.
I use Amazon S3 to host this blog. It is a cheap and low-maintenance way to host a static website, although these advantages come with a few drawbacks. For example, up until a few months ago you couldn’t even redirect one URL to another. On a standard web host, this is as easy as making some changes to a configuration file.
Amazon now supports redirects, but they aren’t easy to configure. To set a redirect, you upload a file to your S3 bucket and set a particular piece of metadata. The contents of the file don’t matter; usually you use an empty file. You can use Amazon’s web interface to set the metadata, but this is obviously not a good long-term solution.
Update: There are actually two types of Amazon S3 redirects.
I briefly discuss the other here.
So I wrote a Python script. This was inspired partly by a conversation I had with Justin Blanton, and partly by the horror I felt when I ran across a meta refresh on my site from the days before Amazon supported redirects.
Boto
The Boto library provides a pretty good interface to Amazon’s API. (It encompasses the entire API, but I am only familiar with the S3 part.) It does a good job of abstracting away the details of the API, but the documentation is sparse.
The main Boto objects I need are the bucket object and the key object, which of course represent an S3 bucket and a key inside that bucket, respectively.
The script
The script (listed below) connects to Amazon and creates the bucket object on lines 15 and 16. Then it calls bucket.list() on line 17 to list the keys in the bucket. Because of the way the API works, the listed keys will have some metadata (such as size and md5 hash) but not other (like content type or redirect location). We load the keys into a dictionary, indexed by name.
Beginning on line 20, we loop through the redirects that we want to sync. What we do next depends on whether or not the given redirect already exists in the bucket. If it does exist, we remove it from the dictionary (line 23) so it won’t get deleted later. If on the other hand it does not exist, we create a new key. (Note that bucket.new_key on line 25 creates a key object, not an actual key on S3.) In both cases, we use key.set_redirect on line 32 to upload the key to S3 with the appropriate redirect metadata set.
Line 28 short-circuits the loop if the redirect we are uploading is identical to the one on S3. Originally I was going to leave this out, since it requires a HEAD request in the hopes of preventing a PUT request. But HEAD requests are cheaper and probably faster, and in most cases I would expect the majority of the redirects to already exist on S3, so we will usually save some requests. Also, I wanted it to be able to print out only the redirects that had changed.
At the end, we delete each redirect on S3 that we haven’t seen yet. Line 40 uses Python’s ternary if to find each keys redirect using get_redirect, but only if the key’s size is zero. This is to prevent unnecessary requests to Amazon.
I posted a more complex version of the code on GitHub that has a command line interface, reads redirects from a file, and does some error handling.
How to write a shell script to delete Latex log files.
Also, why you should think about using zsh.
[Update: In addition, I reveal my complete ignorance of Bash. See the note at the end.]
I try not to write a lot of shell scripts, because they get long and complicated
quickly and they are a pain to debug. I made an exception recently because Latex auxiliary files were annoying me,
and a zsh script seemed to be a better match than Python
for what I wanted to do.
Of course, by the time I was finished adding in the different options I wanted,
Python may have been the better choice. Oh well.
For a long time I have had an alias named rmtex which essentially did
rm *.aux *.log *.out *.synctex.gz to rid the current directory of Latex
droppings. This is a dangerous alias because it assumes that all *.log files
in the directory come from Latex files and are thus unimportant.
But I’m careful and have never accidentally deleted anything (at least not
in this way). What I really wanted, though, was a way to make rmtex recurse through subsirectories,
which requires more safety.
Here is what I came up with. (I warned you it was long!)
I will point out some of the key points,
especially the useful things that zsh provides.
#!/usr/local/bin/zsh
# suppress error message on nonmatching globssetopt local_options no_nomatch
USAGE='USAGE: rmtex [-r] [-a] [foo]
Argument:
[foo] file or folder (default: current directory)
Options:
[-h] Show help and exit
[-r] Recurse through directories
[-a] Include files that do not have an associated tex file
[-n] Dry run
[-v] Verbose
'# Option defaultsfolders=(.)recurse=falseall=falsedryrun=falseverb=falseexts=(aux synctex.gz log out)# Process optionswhilegetopts":ranvh" opt;docase$opt in
r)recurse=true;; a)all=true;; n)dryrun=trueverb=true;; v)verb=true;; h)echo$USAGEexit0;;\?)echo"rmtex: Invalid option: -$OPTARG" >&2exit1;;esacdone# clear the options from the argument stringshift$((OPTIND-1))# set the folders or files if given as argumentsif[$# -gt 0];thenfolders=$@fi# this function performs the rm and prints the verbose messagesfunction my_rm {if$verb;thenfor my_rm_g in $1;doif[ -f $my_rm_g];thenecho rm $my_rm_gfidonefiif ! $dryrun;then rm -f $1fi}# if all, then just do the removing without checking for the tex fileif$all;thenfor folder in $folders;doif[[ -d $folder]];thenif$recurse;thenfor ext in $exts; my_rm $folder/**/*.$extelsefor ext in $exts; my_rm $folder/*.$extfielse# handle the case that they gave a file rather than folderfor ext in $exts; my_rm "${folder%%.tex}".$extfidoneelse# loop through foldersfor folder in $folders;do# set list of tex files inside folderif[[ -d $folder]];thenif$recurse;thenfiles=($folder/**/*.tex)elsefiles=($folder/*.tex)fielse# handle the case the the "folder" is actually a single filefiles=($folder)fifor f in $files;dofor ext in $exts;do my_rm "${f%%.tex}".$extdonedonedonefi# print a reminder at the end of a dry runif$dryrun;thenecho"(Dry run)"fi
It starts out nice and easy with a usage message.
(Always include a usage message!)
Then it processes the options using getopts.
Zsh has arrays! Notice line 20 defines the default $folders variable to be
an array containing only the current directory.
Similarly, line 25 defines the extensions we are going to delete,
again using an array.
On the subject of arrays, notice that $@ in line 59, which represents
the entire list of arguments passed to rmtex, is also an array.
So you don’t have to worry about writing "$@" to account for
arguments with spaces, like you would have to in Bash.
Lines 63 to 75 define a function my_rm which runs rm,
but optionally
prints the name of each file that it is deleting.
It also allows a “dry run” mode.
On to the deleting.
First I handle the dangerous case, which is when the -a option is given.
This deletes all files of the given extensions, like my old alias.
Notice the extremely useful zsh glob in line 82.
The double star means to look in all subdirectories for a match.
This is one of the most useful features of zsh and keeps me away from
unnecessary use of find.
In lines 93 through 117, I treat the default case.
The $files variable is set to an array of all the .tex files in a given
folder, optionally using the double star to recurse through subdirectories.
We will only delete auxiliary files that live in the same directory as a
tex file of the same name. Notice lines 98 and 100, where the
arrays are defined using globs.
In line 108, I delete each file using the substitution command
${f%%.tex} which removes the .tex extension from $f so
I can replace it with the extension to be deleted.
This syntax is also available in Bash.
My most common use of this is as rmtex -r to clean up a tree full
of class notes, exams, and quizzes that I have been working on,
so that I can find the PDF files
more easily. If I’m feeling especially obsessive, I can always run
rmtex -r ~, which takes a couple of minutes but leaves everything
squeaky clean.
[Update:
While zsh is the shell where I learned how to use arrays and advanced globs,
that doesn’t mean that Bash doesn’t have the same capabilities.
Turns out I should have done some Bash research.
Bash has arrays too!
Arrays can be defined by globs, just as in zsh. The syntax is slightly
different, but works just the same. Version 4 of Bash can even use **
for recursive globbing.
Thanks to John Purnell for the very gracious email.
My horizons are expanded.]
When it comes to working at the command line, there is really no limit to the amount of customization you can do. Sometimes it is hard to know where to start.
These are the three most helpful tools I use.
Autojump
Seth Brown introduced me to Autojump, and I am extremely grateful.
It tracks which directories you use and lets you jump from one to another. All you have to do is type j and part of the directory name. So j arx will take me to ~/code/BibDesk/arxiv2bib, and then j nb will take me to ~/Sites/nb. It feels like magic.
If you have homebrew, it can be installed with brew install autojump.
View man pages in BBEdit
I use this function all the time. Man pages aren’t very useful if they are clogging up the terminal. You can easily adapt this for your text editor.
function bbm(){cmd=$(tr [a-z][A-Z]<<<"$1")man $1| col -b | /usr/local/bin/bbedit --view-top --clean -t "$cmd MANUAL"}
The second line converts the name of the man page to upper case. This is used in the third line to set a title. The --clean option makes it so BBEdit doesn’t ask you if you want to save when you close the window.
Put the function definition into ~/.bash_profile.
IPython
I tried IPython several times before it stuck, but I can’t imagine going back to the standard Python interactive interpreter.
IPython has many, many features, but it is worth it just for the tab completion. Type the name of a variable, add a dot, and press tab to see all of the object’s methods and other attributes. Also, each history item contains the entire command, as opposed to just one line, making it possible to edit that for loop that you messed up.
The thing that kept me out of IPython for so long was that I didn’t like its default settings and didn’t want to figure out how to fix it.
In case this is stopping anyone from having a much better Python experience, here is a condensed version of my ipython_config.py file for my default profile.
c=get_config()c.TerminalIPythonApp.display_banner=False# Skip startup messagec.TerminalInteractiveShell.confirm_exit=False# Ctrl-D means quit!c.TerminalInteractiveShell.autoindent=False# I can indent my own linesc.PromptManager.in_template='>>> '# The IPython prompt isc.PromptManager.in2_template='... '# useful, but I preferc.PromptManager.out_template=''# the standardc.PromptManager.justify=False# prompt.
For more information about where this should go, run ipython profile list.
IPython can be installed with easy_install ipython.
After my post two weeks ago about managing my library of academic papers, someone mentioned that I should upload the arxiv2bib script that I wrote to the Python Package Index (PyPI).
I have been curious about Python packaging before, but had never really understood it. This script was the perfect candidate for me to experiment on: a single python file with no dependencies. So I dove in.
I’ll be honest, it wasn’t easy. In the end it worked, and I was even able to use my newfound knowledge to upload my more complicated Day One Export script, which has templates, multiple files, and dependencies. But I spent more time than I wanted to screwing things up. Worst of all, I don’t see any way I could have avoided all these mistakes. It really is that convoluted.
So here is my story. This is not a tutorial, but hopefully my journey will enlighten you. The links should be helpful too.
Distutils
Python packaging is centered around the setup.py script. Python comes with the distutils package, which makes creating the script really easy, assuming that you don’t want to do anything complicated. (Caveat: you often need to do something complicated.) Without needing any extra code, the distutils package empowers setup.py to build and install python modules, upload them to PyPI, even create a bare bones Windows graphical installer.
I followed this guide from Dive into Python 3 (everything applies to Python 2). All you have to do is fill in the arguments to the setup script. Then you run python setup.py sdist to create a tar.gz containing the source. With python setup.py register, it registers the current version of the project on PyPI (you will need an account first). Finally, python setup.py upload will upload the distribution to PyPI.
At this point, things were working, but not as well as I wanted. First of all, I wanted my script to work with either Python 2 or Python 3. This isn’t too difficult; I just copied some install code from Beautiful Soup.
I also wanted things to work on Windows, but this was much more difficult. You can designate certain files as “scripts”, and distutils will copy them into /usr/local/bin (or similar). On Windows, it copies to C:\Python27\Scripts, but Windows won’t recognize a Python script as executable unless it ends in .py. So I made the install script rename the file if it was installing on Windows.
Because setup.py is just a Python file, it can really do just about anything. (Another reason to use virtualenv, so that you don’t have to sudo someone else’s script.) But if you find yourself doing crazy things, take a deep breath, and just use setuptools.
Setuptools
Setuptools is not part of the Python standard library, but it is almost universally installed. This is the package that brings eggs and easy_install and is able to resolve dependencies on other packages. It extends the capabilities of distutils, and makes a lot of things possible with a lot less hacking.
There are plenty of setuptools guides. For my Day One Export script, I was most interested in declaring dependencies, which is done with the install_requires argument (as in this). For both scripts, I was also interested in the entry_points argument, which allows you to make executable scripts that run both in Windows (by creating an exe wrapper) and in Unix (the usual way).
If I were to do it again, I would skip distutils and just use setuptools.
One thing I did stress about was what to do for users that don’t have setuptools installed. Some packages use distutils as a fallback, while others don’t. In the end, I settled for printing a nice error message if setuptools is not installed.
Distribute?
Here is where things get really confusing. Distribute is a fork of setuptools. For the most part, you can pretend it doesn’t exist. It acts like setuptools (but with fewer bugs), so some people will technically use distribute to install the package instead of setuptools. But this doesn’t affect you.
Distribute also has Python 3 support, so all Python 3 users will be using it instead of setuptools. Again, this doesn’t affect you much, except that distribute offers some tools to automatically run 2to3 during installation.
It is confusing enough to have three different packaging systems,
but the Python maintainers aren’t happy enough with setuptools/distribute to
bring them into the standard library. The goal is to replace all three with a better system. It is currently being developed as distutils2, but will be called packaging when it lands in the standard library. At one point, this was scheduled to happen with Python 3.3, but that has been pushed back to version 3.4.
Was it worth it?
Well, I’m glad I finally understand how these things work. And this is the sort of thing that you will never understand until you do it yourself. So in that sense, it was worth it.
The number of people who will use a script that can be installed, especially via pip or easy_install, is likely an order of magnitude more than then number of people who would use the script otherwise. So packaging is the nice thing to do.
Even for my own use, it is nice to have these scripts “installed” instead of “in ~/bin”. I can use pip to check the version number, quickly install a new version, or uninstall.
In January, Gabe Weatherhead posted a great way to proofread using BBEdit. His idea is to define a custom “language” with a list of commonly confused words as the “keywords”. So just like how in Python mode BBEdit changes the color of if and else, in Grammar mode it can highlight their and there, or whatever other words you specify.
To do this, you create a plist file and save it into the Language Modules folder inside the BBEdit Application Support folder. Gabe links to his plist file in the post referenced above.
Highlight regular expression matches
You can take this idea one step further. A language module can use a regular expression to define what a “string” should look like. This gives you a lot of flexibility. For example, you can use this to highlight all duplicate words in the document.
Here is the regular expression that matches duplicate words. You put this into the language module plist as the String Pattern.
\b(?P<dupe>\w+)\s+(?P=dupe)\b
The \b is a word anchor, and matches at the beginning or end of a word.
Then (?P<dupe>\w+) finds one or more word characters and captures them to the dupe register. Next, \s+ looks for one or more whitespace characters.
Finally, (?P=dupe) looks for the contents of the dupe register. The final \b ensures the end of the match is at the end of a word.
BBEdit lets you customize the color scheme for each different language. So even though my strings are usually green, I made them red for the Grammar language.
Google Reader fetches my RSS feed about once every hour. So if I publish a new post, it will be 30 minutes, on average, before the post appears there. If I notice a typo but Google Reader already cached the feed, then I have to wait patiently until the Feed Fetcher returns. In the mean time, everyone reads and makes fun of my mistake.
Here is how to let Google Reader know that it should cache your feed now. This uses a protocol called PubSubHubbub, sometimes abbreviated PSH or PuSH.
It seems like almost no one uses PSH. Even Google, who created the protocol, apparently has forgotten about it. But Google Reader supports it, and almost everyone uses Google Reader, so that makes this useful.
1. Link your feed to a hub
Include a rel="hub" link in your feed to specify a PSH hub. Google runs one at pubsubhubbub.appspot.com. In theory, there could be other hubs, but I don’t know of any.
If you have an Atom feed, put the following line after the feed element open tag:
Now wait until the Google Bot reads your feed for the changes to take effect. Google Reader sees the link and asks the hub to notify it when the feed changes.
2. Ping the hub
Each time you publish a new post or edit a recent post, run this command at the terminal:
Of course, change {feed_url} to the URL for your feed. This command tells the hub to fetch your updated feed. The hub informs Google Reader and any other service that has asked to be notified. In my tests, it took about five seconds for the new (or updated) story to appear in Google Reader.
More information
At https://pubsubhubbub.appspot.com/topic-details?hub.url={feed_url}, you can see the last time the hub checked your feed.
Using PSH makes it so Google Reader polls your site less often, since it assumes you will notify them when something changes. So either go all in or don’t bother.
I use Jumpcut to save and use my clipboard history.
One downside to Jumpcut is that it doesn’t play nicely
with TextExpander. Because TextExpander manipulates the
clipboard, Jumpcut captures every expanded snippet into its
history. Some people may be able to tolerate this kind of pollution,
but I cannot.
So I don’t use TextExpander. I have often wanted to, but not enough to give up
Jumpcut. There are clipboard managers built into Launchbar and Alfred which purportedly play nicely with TextExpander (I can verify Launchbar but not Alfred), but even this cannot persuade me to give up Jumpcut.
Jumpcut is open source,
but I know nothing of Objective-C or Mac development.
I do know that TextExpander identifies things it puts on the clipboard with
org.nspasteboard.AutoGeneratedType. Luckily for me, Wolf Rentzsch, whose podcast I just discovered, made a patch to ignore passwords
put on the clipboard by PasswordWallet, which apparently uses a similar
identification scheme. It seemed straightforward to adjust his patch to avoid capturing TextExpander snippets.
Surprisingly, it worked. TextExpander, welcome to the team.
Here is the single line I changed in Jumpcut’s AppController.m:
I have a Jumpcut fork on Github. In addition to this change, I have incorporated some stylistic changes from Dr. Drang’s fork.
Obviously you’ll need Xcode to build it. I’d be happy to send a link to a binary if someone wants it, but I don’t really know what I’m doing. All I know is it works for me.
This week, my method for keeping track of journal articles I use went from kind of cool to super awesome thanks to pdftotext and a tiny Perl script.
Most math papers I read come from the arXiv (pronounced archive), a scientific paper repository where the vast majority of mathematicians post their journal articles. This is the best place to find recent papers, since they are often posted here a year or more before they appear in a journal. It is a convenient place to find slightly older papers because journals have terrible websites. (Papers from the 60’s, which I do sometimes read, usually require a trip to the library.)
I use BibDesk to organize the papers I read, mostly because it works so well with Latex, which all mathematicians use to write papers. Also, it stores its database in a plain text file, and has done so since long before it was cool.
Every now and then I gather all the papers from my Dropbox and iPad and import them into BibDesk. For each PDF I got from the arXiv I do the following:
Find the arXiv identification number, which is watermarked on the first page of the PDF.
Use my script arxiv2bib, which I have written about before to get the paper’s metadata from the arXiv API. An AppleScript takes the result of the script and imports it into BibDesk.
Drag the PDF onto the reference in BibDesk. BibDesk automatically renames the paper based on the metadata and moves it to a Dropbox subfolder.
Three steps is better than the ten it would take without AppleScript and the arXiv API, but why can’t the computer extract the identification number automatically?
The pdftotext utility comes with xpdf, which is available from Homebrew. Or can download the binary linked at foolabs. It works as advertised.
The -n argument tells Perl to wrap the script in the while loop to process stdin one line at a time. Here is what the Perl script would look like if I had put it in its own file.
The regular expression looks for a line beginning with an arXiv identifier, which looks like arXiv:1203.1029v1.
If it finds something, it prints the captured part, that is, the actual number. Then it exits the loop.
I can pipe the output of this script into arxiv2bib to fetch the metadata from the arXiv API. An AppleScript glues it all together, allowing me to select a whole bunch of PDFs and run the script. A few seconds later, and all the paper metadata is in BibDesk and the files are renamed and in the proper place.
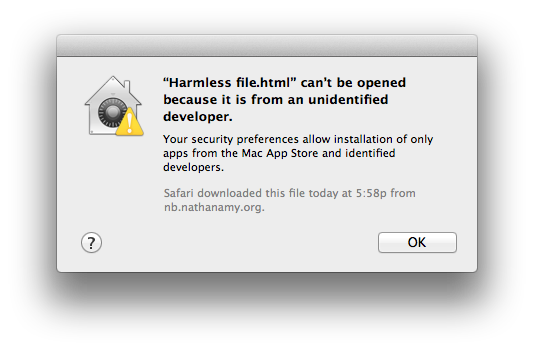
This week my Mac refused to open a plain text file, complaining that it was from an unidentified developer.
Mac OS X 10.8 introduces a new feature called Gatekeeper, which prevents applications from running unless they are either from the App Store or signed by a registered developer.
You can turn Gatekeeper off, but I have kept it on so far. I am willing to run unsigned Apps, but it is nice to be notified that they are unsigned before having to make that choice.
Don’t open that file!
I never expected to be prohibited from opening a text file. Double-clicking the file got me nowhere. Dragging the file onto BBEdit in my dock did nothing. TextEdit, no. Safari, no. Eventually I right clicked the file and clicked “Open”, which is the prescribed way to get around Gatekeeper’s restriction. Of course this worked, but it opened the file in Byword, which is not my default text editor. I was perplexed.
For this to happen, I found that two things were necessary. One, of course, the file had to be downloaded from the internet. Your web browser sets the “com.apple.quarantine” extended attribute, which tells the computer to be extra careful with this file of dubious origin. Two, the file must be set to open in some application other than the default application. You can change which application is set to open a file by selecting “Get Info” in the Finder, and changing which application appears under “Open with”. This information is stored in the file’s resource fork.
This is clearly a bug. Maybe the operating system would want to prevent someone from tricking me into open a file in something other than my default application, but it should definitely allow me to open it by dragging it onto an application of my choice.
Here is a file that should make this happen on your computer: Harmless File.txt. In this case, I set the file to be opened with Safari, instead of whatever your default text editor is.
If you are curious, you can see the extended attributes by using the command
xattr -l "Harmless File.txt" on the command line.
Don’t view that shell script!
There is one other situation that causes similar results. If you have an executable file with no extension, OS X identifies it as a “Unix Executable File” and by default uses Terminal to open it. Gatekeeper also prevents you from opening these files. This makes a little more sense, because opening them in the Terminal actually runs them, which is not what you should do with a random script downloaded from the internet.
What you should do instead is drag them onto a text editor and look at them. But Gatekeeper won’t let you do this either. Worse, if you try to get around Gatekeeper by right clicking and selecting “Open”, the file gets executed in a Terminal window. Oops.
Unquarantine
These seem like edge cases, but they both hit me in the last week, so I created a service in Automator to clear the quarantine bit. (If you download the one I created, you will have to sidestep Gatekeeper, but for valid reasons.)
Here is the shell script from the Automator service:
for f in "$@"do xattr -d com.apple.quarantine "$f"done
This BBEdit filter allows you to cycle through choices for a script’s shebang line. It is a fun little script, and has been surprisingly useful to me.
BBEdit text filters are shell scripts that read from stdin and write to stdout. When you select a filter from the “Apply Text Filter” submenu of the “Text” menu, the text of the current document is fed through your shell script, and the document text is replaced by the output. If some text is selected, only that part passes through the script.
My Python script is super simple. It reads the first line of the file and determines the name of the interpreter. Then it calculates three possible shebang lines: the stock system command (e.g. /usr/bin/python), the one on my custom path (e.g. /usr/local/bin/python), and the env one (e.g. /usr/bin/env python). Then it cycles from one to the next each time you run it through the filter.
As an added bonus, the script is forgiving. So if I want a Python script, I can just write python on the first line, and the filter will change it to #!/usr/bin/python. This is good for me, because for some reason it always takes me three or four seconds to remember if it should be #! or !#. (At least only one of these makes sense. I have even worse problems remembering the diference between $! and !$ in bash.)
#!/usr/bin/pythonimportsysimportosLOCAL="/usr/local/bin:/usr/local/python/bin:/usr/bin:/bin:/usr/sbin:/sbin:/usr/texbin:/Users/grigg/bin"SYSTEM="/usr/bin:/bin:/usr/sbin:/sbin"defwhich(command,path):"""Emulate the 'which' utility"""forpinpath.split(':'):full_command=os.path.join(p,command)ifos.path.isfile(full_command)andos.access(full_command,os.X_OK):returnfull_commandreturn""transformations=[lambdas:which(s,SYSTEM),lambdas:which(s,LOCAL),lambdas:"/usr/bin/env "+s]# deal with the first lineline=original_line=next(sys.stdin).strip('\n')ifline[:2]=="#!":line=line[2:].strip()base=line.rsplit('/',1)[-1]ifbase[:4]=='env ':base=base[4:].strip()if' 'inbase:base,args=base.split(' ',1)args=' '+argselse:args=''# do the transformationsoptions=[T(base)forTintransformations]# filter out the empty ones while appending argsoptions=[o+argsforoinoptionsifo]# if the only one is the /usr/bin/env, don't do anythingiflen(options)<=1:printoriginal_lineelse:dedupe=list(set(options))iflineindedupe:dedupe.sort()index=dedupe.index(line)line=dedupe[(index+1)%len(dedupe)]# cycleelse:# can't cycle, just use the first optionline=options[0]print"#!"+line# print every other lineforlineinsys.stdin:printline,
The possible transformations are listed beginning on line 17. The order of this list sometimes matters; it determines which transformation should be used if the current shebang doesn’t match any of the options (see line 49).
The current shebang is interpreted on lines 22 through 32. It’s pretty basic, just using the first word after the last slash as the interpreter. That should cover most use cases.
(I am very happy that when I write base[:4] in line 26, Python doesn’t complain if base has fewer than four characters. Contrast this with AppleScript, which fails if base is short and you say text 1 thru 4 of base. You can get around this by testing base begins with "env ". Sorry for the tangent.)
In lines 42 through 46, we get to the cycling. I deduplicate the list, alphabetize, look up the current shebang in the list, and cycle to the next. It is fun how the filter uses the first line of the input file to essentially save state, so it knows where to go next time it is run.
Mountain Lion deleted all my Python packages, just like Lion did last year. I’m determined not to be fooled a third time, so this time I installed my packages to a custom directory using virtualenv.
Virtualenv is advertised as a way to create multiple isolated Python environments on the same computer, switch between them easily, etc. I don’t need all of that. I just want to control where Python packages are installed with no fuss. Virtualenv does that also.
Set up a virtual environment
First, install virtualenv. I recommend installing pip and running pip install virtualenv. If you think it is already installed but it isn’t working, this is probably because Mountain Lion deleted it with the rest of your packages. Reinstall virtualenv.
Second, run virtualenv /usr/local/python. This creates a new Python environment based at /usr/local/python. Of course, you can make this any path you want.
The site-packages directory is where your packages will be installed. The bin directory contains a special pip executable, which automatically installs new packages to your custom directory. It also contains a python executable, which will make these packages available to a Python session. Also, if you install any package that has a command line interface, the executable file will go in this bin directory. I added /usr/local/python/bin to (the front of) my PATH to make these easily accessible.
Make these packages available to the system’s Python
Third, create a file local.pth (name doesn’t matter, but extension does) inside the /Library/Python/2.7/site-packages folder with a single line:
/usr/local/python/lib/python2.7/site-packages
This tells the regular system Python to also load packages from my custom location. So even if I run /usr/bin/python, I will be able to import my packages.
As long as I always use the pip command that virtualenv created to install new packages, this third step is the only thing I will have to repeat next year, when OS X 10.9 “Volcano Lion” clears out the system site-packages folder again.
A while back, I wrote about ending lines at natural breaks, like at the end of phrases and sentences. In Latex documents, code documentation, git commits, and other situations where I am writing prose but “soft wrapping” is undesirable, this makes revising and rearranging the text much easier. My favorite part is that I no longer have to worry about refilling the lines every time I make a change.
In that post, I linked to a “new line after punctuation” BBEdit AppleScript I wrote. Some time later, I realized that using AppleScript to run BBEdit searches can be way more efficient than pure AppleScript or even Python alternatives. I thought I would use this to extend my new line script to also handle some math-breaking heuristics. That failed because it got too complicated for me to predict what it was going to do. The most important thing about text editor commands is that they be completely predictable so they don’t interrupt your editing flow.
Still, using BBEdit’s find command simplified my new line script and made it one-third as long. I thought it would be another helpful example of how to script BBEdit, so I’m am posting it here. If you are looking for other examples of this kind of script, Oliver Taylor recently posted a collection of helpful cursor movement scripts, most of which use BBEdit’s find function in a similar way.
The new “new line after punctuation”
tellapplication"BBEdit"-- save location of current cursorsetcursortoselectionsetcursor_chartocharacterOffsetofcursortelldocument1setsearchtofind"^([ \\t]*)(.*)([.,!?;:])[ \\t]+"¬
searchingintext1¬
options{searchmode:grep,backwards:true}withoutselectingmatchiffoundofsearchandstartLineoffoundobjectofsearch¬
is equaltostartLineofcursorthen-- found punctuation, insert returnsetreplacementtogrepsubstitutionof"\\1\\2\\3\\r\\1"setdiffto(replacement's length)¬
-(lengthoffoundobjectofsearch)setcontentsoffoundobjectofsearchtoreplacementelse-- no punctuation, just insert a return heresetsearchtofind"^[ \\t]*"searchingintext1¬
options{searchmode:grep,backwards:true}withoutselectingmatchiffoundofsearchandstartLineoffoundobjectofsearch¬
is equaltostartLineofcursorthensetindenttocontentsoffoundobjectofsearchelsesetindentto""endifsetdiffto(lengthofindent)+1setcontentsofcharactercursor_charto¬
("\r"&indent&contentsofcharactercursor_char)endif-- adjust cursor to keep it in the same relative locationselectinsertionpointbeforecharacter(cursor_char+diff)endtellendtell
We begin by telling BBEdit to get the selection object. This contains information about the cursor location if no text is selected. For convenience, we save the characterOffset of the selection, which is the character count from the beginning of the document to the cursor location.
The heavy lifting is done by the grep search in line 7. Here it is with undoubled backslashes, which had been escaped for AppleScript.
^([ \t]*)(.*)([.,!?;:])[ \t]+
The ^ anchors the search to the beginning of a line. The ([ \t]*) captures any combination of spaces and tabs to \1. The (.*) captures as many characters as possible to \2. The ([.,!?;;]) captures a single punctuation mark to \3. The final [ \t]+ requires one or more whitespace characters after the punctuation and captures this whitespace to the search result, but not to any particular group. This is so I don’t insert a new line where there wasn’t already whitespace, and also to throw away whatever whitespace was there.
Lines 8 and 9 search backwards from the current cursor position. If this command (and many that follow) weren’t inside a tell document 1 block, I would need text 1 of document 1 instead of text 1. If you allow BBEdit to select the match, you can see selection flashing while the script runs, which I don’t like. Also, it messes up the cursor location, which will change the result of future searches within the script.
Lines 11 and 12 make sure the script found something on the current line. If so, line 14 uses BBEdit’s grep substitution command to form a string with the whitespace, followed by the line up to the punctuation, followed by the punctuation, a return, and then the whitespace repeated. Line 17 does the replacement.
Lines 20 through 31 deal with the case that no punctuation is found. This just inserts a return at the current cursor location, matching the current line’s indentation.
Line 34 moves the cursor to a new location to make up for the text that has been added.
This script is also available as a gist. I have it assigned to the keyboard shortcut Control+Return.
Note: the Day One Mac app can export to plain text, and in the future the
iOS apps will export to PDF. This is for people who need or want extra
customization options.
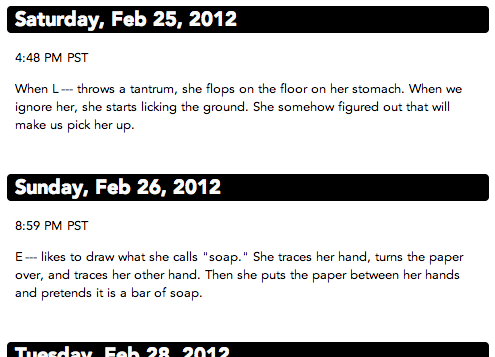
My Day One journal
I have always been a fan of the Day One Mac and iOS Apps. I was keeping an electronic journal before Day One came along (in Latex, if you must know), but I quickly changed my ways. Day One makes things easier and more fun.
I switched to Day One quickly, but not without an abundance of caution. The last thing I want is for my journal to be unreadable 5 years from now. I was reassured to see that Day One stores each journal entry as a plist file. Furthermore, the entry itself is 100% certified organic plain text. The rest of the plist is just metadata.
As time passed, Day One added features. Most recently, they added the ability to include photos, location information, and weather. All this talk about new features scared me, because more features almost always means more complication. In this case, there was a good chance the extra complication would make my data less future-proof. But in the end, there was no need for me to worry. These guys are good.
A Day One entry is still a simple plist file. The entry itself is still plain text. Location and weather are just more metadata. Best of all, photos can be included with but not inserted into an entry. There is no need for any markup within the journal entry saying “this is where the photo goes.” You don’t have to base64-encode or link to an external file or any of the other awful things word processors have done when dealing with images. A photo is just another piece of metadata that says “This photo goes with that journal entry.”
A Day One export tool
I put together a Python script to export my journal entries. It uses a Jinja template to combine my Day One entries into a single file of whatever format I want. A simple template and a few lines of css turned my journal into enough html to fill 80 printed pages:
I wrote it for myself, but I thought others might find it useful, so I have posted it on github.
Reading plist files in Python
This part is easy. Just import plistlib and do
plistlib.readPlist(filename)
Using Jinja templates in Python
This is more complicated, and the main thing I learned by making this script. The following script fills in a Jinja template:
 1
 2
 3
 4
 5
 6
 7
 8
 9
10
fromjinja2importEnvironment,FileSystemLoaderimportos# j contains list of entries, template is the name of the template file,# and markdown_filter is a function which converts markdown to htmlpath,base=os.path.split(template)env=Environment(loader=FileSystemLoader(path),trim_blocks=True)env.filters['markdown']=markdown_filtertemplate=env.get_template(base)output=template.render(journal=j)
Loading the template file was a little confusing. First, you set up the environment with a FileSystemLoader in line 7, which takes one or more search paths as an argument. Then the get_template command in line 9 searches through all of the paths for the template you are looking for. I could not find a way to just load an arbitrary template file, hence the awkward workaround in line 6.
Writing Jinja templates
If you’ve ever used Liquid or any other templating language, Jinja looks pretty familiar. Here is a basic template to produce an html version of my journal:
<!DOCTYPE html><html><head><title>Journal Entries</title><linkrel="stylesheet"href="style.css"type="text/css"><metacharset="UTF-8"/></head><body><h1class="page-title">Journal Entries</h1>{% for entry in journal %}
<articleclass="entry"><h1class="entry-title">{{ entry['Date'].strftime('%A, %b %e, %Y') }}</h1><pclass="location time"> {% if 'Location' in entry %}
{{ entry.place(ignore="United States") }},
{% endif %}
{{ entry['Date'].strftime("%-I:%M %p %Z") }}
</p><divclass="entry-text"> {% if 'Photo' in entry %}
<imgclass="entry-photo"src="{{ entry['Photo'] }}"/> {% endif %}
{{ entry['Text'] | markdown }}
</div></article>{% endfor %}
</body></html>
Control statements go inside {%...%} blocks, like the for loop from line 10 to line 26 which loops over all the entries. Recall that the journal variable is passed to the template from Python (in line 10 of the Python code above).
Variables are inserted into the document using {{...}} blocks, like the date on line 12 and the photo on line 21. Jinja allows a lot of Python into variable blocks (more than Liquid allows Ruby), which means I can call strftime to format the date in the way that I want. You see more of this on line 14 with the in in the if block, and on line 15 which uses the place method of the entry object.
Line 23 shows how to apply a filter to a variable. The text of the variable passed through the markdown filter. This is a custom filter defined in my Python script, but there are also several built-in filters.