I highly recommend Footpath for planning a running route. Draw your route with your finger and you get mileage and elevation profile.
We have been having so much fun with Zelda at our house. I would usually consider myself a casual gamer, but I can’t put this down.
I really wanted to do a Route 1 road trip this summer, but it seems a shame to detour around Big Sur.
I accidentally called 911 while trying to change my watch band.
Tonight I went to “Into the Woods,” currently on tour in Los Angeles. I’m a fan since I saw the movie version, but it was way better on stage. Amazingly talented people, highly recommended.
This entirely serious LA Times piece could be an Onion article. “Our city depends on a Hispanic population to support our comfortable lifestyle.”
This is the fourth and last in a series of posts
describing the system I built to monitor long-running commands.
The third post explained my mon script, which together
with my twait script from the second post,
lights up an LED when a command in a tmux pane or iTerm window completes.
If I want to monitor a command, I use mon twait ID, where ID is the pane or
window ID. Or I can run another command only if the first command is successful,
by writing twait ID && ./other_command.
Of course it would be annoying to type the window ID manually, so I have two
keyboard shortcuts. One to start mon twait ID in a separate window that closes
automatically when it is done. The other to open a new window with the text
twait ID && followed by a space.
Tmux integration
Tmux can be scripted through the use of unix-like commands, with arguments and
options. These can either be run from the command line or assigned keyboard
shortcuts.
I use Ctrl-A plus uppercase E for the first.
bind E run "tmux split-window -l 5 \"mon twait #D\""
This splits to form a new window, 5 lines high, and runs mon twait. The #D
parameter in a tmux run command gets translated into the pane ID.
I use Ctrl-A plus lowercase E for the second.
bind e run "tmux split-window; tmux send-keys \"twait #D &&\""
iTerm integration
You can do very similar things with iTerm using AppleScript.
To open the monitor in a temporary pane, I use this script.
It is possible to control the height of the new pane, but I haven’t
figured it out yet.
This is the third in a series of posts
describing the system I built to monitor long-running commands.
The second post explained my twait script, which
waits for a command in a separate tmux pane or iTerm window to complete,
and then exits with the same code.
The easiest way to get notified when twait finishes is to chain the commands:
twait %22; notify
But this ignores the return value, which is a useful part of the notification.
You could solve this by passing the return value as an argument:
twait %22; notify $?
The $? variable contains the return code of the last command.
I mostly use a script called mon that takes the other command as an argument:
mon twait %22
Since mon is running the command, it has access to its exit code. It can also
do some prep work before running the command. The downside is that you have to
keep the command fairly simple; using pipes, multiple commands, or shell aliases
does not work properly.
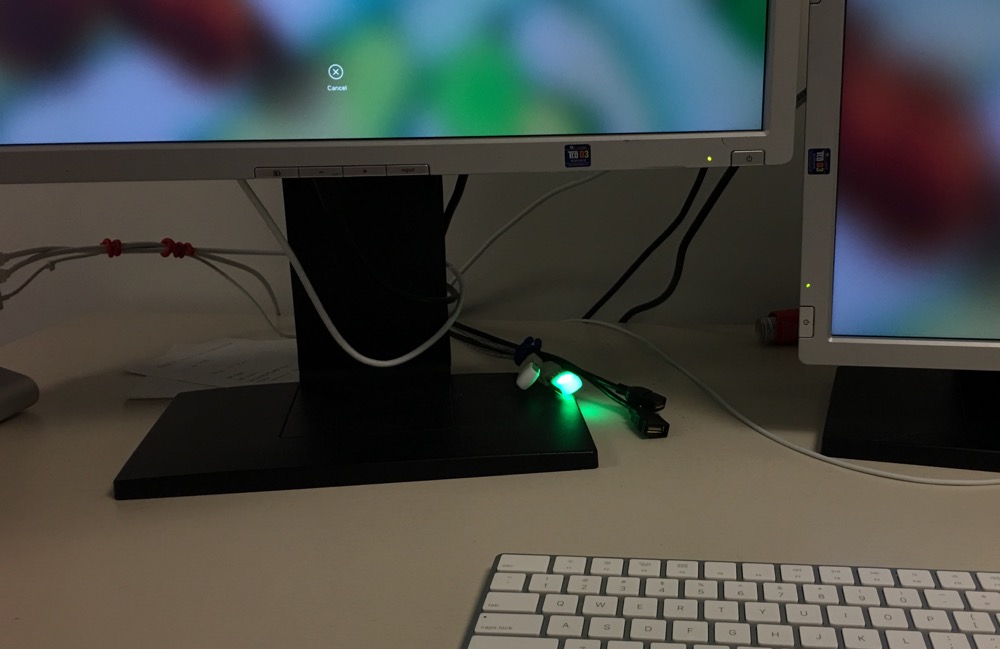
Here is the code to my monitor script, which lights my blink LED and
sends a Pushover notification.
#!/bin/bash
set -eu
function blink(){ blink1-tool -m 0"$@" > /dev/null
}blink --rgb 170,170,170
echo"Monitoring $@""$@"rc=$?case$rc in
0) blink --green
title="Process succeeded";; 1) blink --red
title="Process failed";; *) blink --blue
title="Process failed";;esacpushover "$title""Exited with code $rc"
This sets the LED to a dim white at the beginning of the command, prints a
message, and then runs the command. The $@ variable contains all of the
arguments to the script, which should be the command to run, followed by its
arguments. When we are done with the command, we capture the return code.
Depending on the value of the return code,
I turn the LED green, red, or blue, and send a message to my phone and watch.
The pushover script uses curl to send a request to the pushover servers.
This is the second in a series of posts
describing the system I built to monitor long-running commands.
The first post explained how I write a text file of the form
$HOME/.local/logs/return-$ID every time a command finishes.
The ID variable is the unique identifier for the tmux pane or iTerm window.
Each file contains a single line with the return code of the last command to
complete in that window.
Now that a file is being written every time a command finishes, it is not
difficult to wait for a command from a given window to finish.
I call this script twait, meaning “wait for terminal.”
It takes a window’s unique identifier as its only argument,
waits until the corresponding return file is modified,
then exits with the status read from that file.
#!/bin/bash
set -eu
returnfile="$HOME/.local/logs/return-$1"inotifywait -qq -e close_write $returnfile&&exit$(cat $returnfile)
This uses inotify (on my Linux machine at work) to wait until
someone writes to the return file. Then it reads the entire contents of the
return file (using cat) and uses that as the exit code for the script.
This is a suprisingly useful command. Although I originally built it with
only monitoring in mind, it serves as a useful way to queue up any follow-up
command. In one window I can write build,
and in a separate window I can write twait %22 && ./run. This will wait for
the build to finish, and as long as it is successful, run some other command.
It is
not uncommon for me to have a chain of three or four tmux panes stacked
vertically, each running one of a series of commands. It makes it very easy to
quickly visualize the progress of the command sequence.
In the next post, I will show how I use twait to do the monitoring,
and in the final post of the series I will share some tmux/iTerm integrations
that make it easier to use both twait and my monitoring script.
This is the first in a series of posts
describing the system I built to monitor long-running commands.
For me, this started as a way to light a blink 1 LED
at work when a long build completed,
bringing me back to the more important task from whatever may have
distracted me.
After a recent post by Casey Liss, I’ve added watch notifications to
the mix.
The problem, for me at least, is that I never know when a command is going to
take long enough that I lose interest and want a notification,
so appending a command at the end of the original is not an option:
build; notify
You could always run build, and then when you realize you want notified, type
notify blindly, but any stray keys or sometimes even mouse scrolling might
mess up the follow up command. (Or whatever long-running command you are using
might be capturing stdin.)
What I really wanted was a way for any terminal window to wait on any other
terminal window.
And of course, it would be nice to be able to do something different depending
on what the return value is.
The first step is to capture and log the return value of every command in every
window. Not long ago, this would have seemed ludicrous, but with SSDs, it really
isn’t a big deal to write to disk once per command.
Unique window identifiers
To be able to tell one command from another, you need some kind of an identifier
for each window.
At work, I always use tmux, which calls windows panes,
and gives each pane an incrementing identifier,
stored in the TMUX_PANE variable.
At home, I use iTerm2,
which sets the TERM_SESSION_ID variable.
This variable actually has two parts separated by a colon, and the unique id is
in the second part, which is accessible using parameter subtitution
as ${TERM_SESSION_ID#*:}.
Log the return value
Both zsh and bash can run an arbitrary command right before drawing the prompt,
that is, right after any command finishes. This is a perfect place to capture
and log the return value.
In zsh, this is precmd, so you can define something like this in your
zshrc (using tmux pane):
When I was 20 and living in Chile, I was in a car accident. I was driving
through an intersection in the Antofagasta centro and didn’t notice that the
traffic signal was out. Neither did another driver, who happened to be drunk
and driving 70 mph. The truck I was driving rolled twice and landed on its
side. When I was sure my passengers were okay (we were), I climbed out the
window. I pulled out my cell phone and dialed 133, the Chilean 911 equivalent.
I got a busy signal. It didn’t matter. We were downtown and I could already
hear sirens.
A few years ago, my neighbor broke his hip in his driveway. I called 911 on my
cell phone and was connected to the wrong city’s dispatch center. This was
understandable, since I lived on the border of the two cities. They transferred
my call, which was not cumbersome since dispatchers pick up on the first ring.
A few weeks ago, I was driving behind an erratic driver who I thought was
drunk. He was driving slowly and in the middle or wrong side of the road. I
honked, thinking maybe he was just inattentive, and he pulled over, let me
pass, and started following me. At this point I was home, but a little freaked
out, so I drove around the block and circled back, only to find him stopped and
blocking the one-lane street that my house is on. California advertises 911 as
the number to call to report drunk driving, so I gave up on solving things
myself and called 911.
I got a Verizon message that the number I was dialing had been discontinued or
moved.
I tried again. Same thing.
While I sat in my car in disbelief, the driver of the car parked in front of my
house and exited the vehicle. It was an elderly lady and despite her poor
driving was probably not drunk and definitely not out to get me.
I felt a little silly while I parked my car, but what if that had been a more
urgent situation? What if there had been a threat or an accident or a heart
attack and minutes mattered?
How do I fix this?
I spent an hour on the phone with Verizon. I felt only somewhat better to hear
that none of the technicians I worked with had heard of this before. They had
me reset my network settings, reboot my phone, and call 911 again.
Same thing.
I got escalated to the next level. They had me read off a bunch of settings,
which checked out. They had me turn off my phone, they did some kind of hard
reset of my network state on their end, and then had me turn my phone back on
and try again.
This time it worked. (I was apologetic and the dispatchers were understanding.)
And that was it. Verizon is sorry, but nobody has any idea what went wrong.
I programmed my city’s 10-digit emergency number into my phone. Hopefully that
works as a backup.
(Wifi calling was enabled, but I had no wifi connection at the time. I’ve since
disabled it. Voice over LTE was also enabled. I’ve disabled it.)
This looks ominous. (But it wasn’t actually.)
My family was sick all last week, and I fell behind on a tight deadline at work. So in the last two days, I’ve been working like crazy to catch up. Almost done.
I got a debit card for my oldest child so I could move to direct deposit allowance. Dealing with cash gets old fast.
I’ve often wished there were counterparts to the “for Dummies” series labeled “for mathematicians.” Replace 500 pages of babble and sidebars with five pages of formulas and analysis.
I’m trying to figure out a few U.S. tax laws that apply to me for the first time this year.